In this installment of DIY squonk mods, I show you how to build the parallel 18650 squonk mod by ModMaker. Do also take a look at the first four parts:
- DIY Squonk Mod Part 1 – The Research Process
- DIY Squonk Mod Part 2 – ModMaker Parts & Tools
- DIY Squonk Mod Part 3 – Building the ModMaker 18650 Mod
- DIY Squonk Mod Part 4 – Building the Toaster Design 20700 Mod
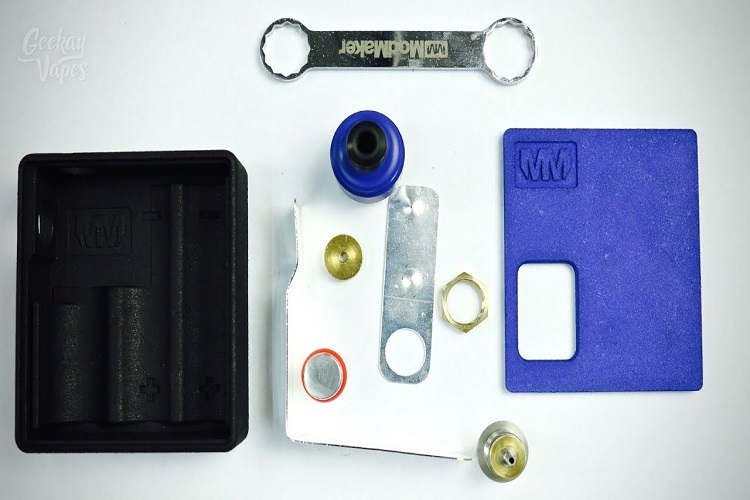
Keep in mind, that a lot of the explanations for the parts and tools are in Part 2. To keep this short, I do not repeat them here.
All the ModMaker parts can be purchased from their online store, while the squonk mod enclosure and doors can be purchased from the ModMaker Shapeways store.
Overall, the quality and measurements for the ModMaker parallel squonk mod were spot on. This time, the button hole was large enough for the button, but ModMaker informed me they also made the hole larger for their ModMaker 18650 mod after my video.
Again, I went for one of the cheapest Nylon options, although you can spend a little more for enclosures and doors with better finishing.
I bought the white version because I was expecting to do some sanding to make parts fit. As you recall from my ModMaker 18650 video the button didn’t fit, and sanding down the black Nylon body exposed the white underneath.
However, this time around I didn’t have to do any sanding. The other reason for getting a white mod is that you can easily dye the 3D print to any color you want.
I’m pretty happy with how the ModMaker Parallel 18650 mod turned out. This time, I went with a black body and blue door. Dyeing the Nylon was pretty easy, especially with the synthetic RIT dyes that I used. It required less dye and less time. In fact, after just 3 minutes you can already achieve the color you want.
This mod was auctioned off and sold, and I thank the buyer for his support. With the proceeds I can keep going and trying new DIY squonk mods for you. The Sledsz.co.uk mods are un next, but I’m also trying to DIY a regulated squonk mod from Florisbox.
After these, the DIY Squonk Mod series will be concluded.